No edit summary |
No edit summary |
||
| Line 34: | Line 34: | ||
ffmpeg -i "my fav video.flv" -target ntsc-dvd -aspect 4:3 "my fav video.mpg" |
ffmpeg -i "my fav video.flv" -target ntsc-dvd -aspect 4:3 "my fav video.mpg" |
||
| − | It is a good idea to cleanup file names here. |
+ | It is a good idea to cleanup file names here. Ideally, your output MPG files will only use these characters: A-Z, a-z, 0-9, space ( ), dash (-), and dot (.) |
Using other characters risks having problems later. |
Using other characters risks having problems later. |
||
| Line 121: | Line 121: | ||
</dvdauthor> |
</dvdauthor> |
||
| − | If you look closely, you will notice two things: |
+ | If you look closely, you will notice two things: |
| − | 1) Each chapter has a separate button in the main menu. |
+ | 1) Each chapter has a separate button in the main menu. |
2) After each chapter, we return to the main menu. |
2) After each chapter, we return to the main menu. |
||
| Line 174: | Line 174: | ||
Becomes... |
Becomes... |
||
chapters="00:00:00" |
chapters="00:00:00" |
||
| + | |||
| + | ==Make the DVD VOB Files== |
||
| + | |||
| + | Run this command: |
||
| + | tovid dvd final_dvd.xml |
||
| + | |||
| + | This one of the longest steps. Be patient as your MPG files are combined to created a few DVD VOB files. |
||
| + | |||
| + | The DVD VOB files will appear in a new directory: "final_dvd" |
||
| + | |||
| + | ==Burn the DVD== |
||
| + | |||
| + | My PC has trouble writing DVDs, so this next step is overly cautious. |
||
| + | |||
| + | I launch the Linux DVD burning software: K3b |
||
| + | |||
| + | Create a new data project and drag the AUDIO_TS and VIDEO_TS folders to the root. |
||
| + | |||
| + | I create an ISO first, then I write the DVD. Finally, I verify the data. (There is an option to verify after write is complete.) |
||
| + | |||
| + | If your PC is more powerful, you may be able to create the DVD more quickly with this command: |
||
| + | tovid dvd -burn final_dvd |
||
Revision as of 16:19, 3 December 2012
Introduction
I like to make DVDs from YouTube videos. This page will explain the precise steps required. I am Linux (Debian) user, but probably these steps can be modified to work under Mac OS/X or Microsoft Windows.
I will be honest here: If you no experience with video on a PC (more than playing DVDs), it is hell the first time you try. All kinds of annyoing packages are necessary and frequently missing. Think of it this way: Manipulating video is incredibly complicated; most people take this for granted. As a result, a huge (read that again... HUGE) number of packages (libraries, binaries, etc.) are required to perform these steps below. Tons of thanks to the incredible communities of volunteers around the world who work tirelessly to create these incredible tools!
Before you start, make sure you have tons of spare disk space. 20/30/40GB of disk space will give you plenty of space to make mistakes and try again and again to get it right.
If you have already selected your videos, you can create a DVD (and burn) in about two to three hours.
Download Videos
I use Firefox as my web browser. You need to get an add-on/extension called "Easy YouTube Video Downloader". Currently, my version is 6.6. This tool will inject a button into your YouTube pages. Check it out:

Click this button to see a list of available formats.
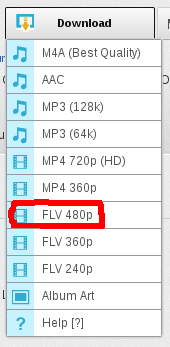
If possible, download FLV 480p, but sometimes only FLV 360p is available. No worries; we can convert any dimensions to the correct output. It might not look perfect -- but good enough.
On average, FLV 480p files are 40MB from YouTube.
Convert FLV to MPG
FLV is a format used by YouTube to show videos. This is a streaming format from Adobe Flash. We need to convert to MPG for DVD videos.
We will use the tool ffmpeg to this do this conversion. This tool has a scary number of command line options; try ffmpeg --help to see for yourself. Installing this package from source is about as painful as anything I can imagine on Linux. (The package transcode is also terrifying to install from source.)
Anyway, here we assume you have access to a reasonable new version of ffmpeg. Let's hope your Linux distro has a nice package. =)
Example:
ffmpeg -i "my fav video.flv" -target ntsc-dvd -aspect 4:3 "my fav video.mpg"
It is a good idea to cleanup file names here. Ideally, your output MPG files will only use these characters: A-Z, a-z, 0-9, space ( ), dash (-), and dot (.)
Using other characters risks having problems later.
Depending on the speed of your PC, it will take 3-5 minutes to convert a FLV file to MPG format. On average, the resulting MPG files will be 100 to 150MB each.
Repeat this command for each FLV file.
Make the DVD Main Menu
Since I am not an expert with these tools, my goal is to create a very simple, elegant main menu.
Create a PNG image using GIMP (or any Adobe Photoshop equivalent) that is 720x480. (That is 720 pixels wide and 480 pixels tall.) If you are not aware, 720x480 is the standard NTSC DVD video. If you are using a different video format, such as PAL DVD video, do a little research on Wiki. You can find the correct dimensions for your video equipment.
Here is a nice sample:
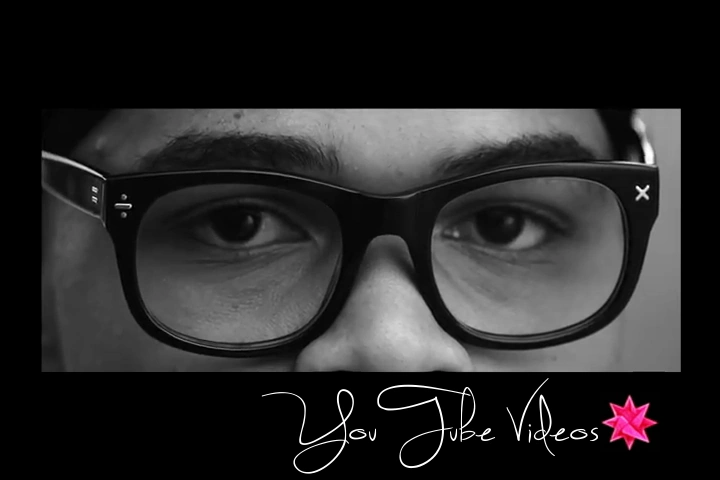
I took that screenshot from Flo Rida's "I Cry" video. The font I found for free on the Internet. Do a little Googling and you can find tons of cool fonts.
Notice that I leave some black space above the photo. This is dual purpose. First is visual elegance, the second is the ToVid tools will put a label in this area.
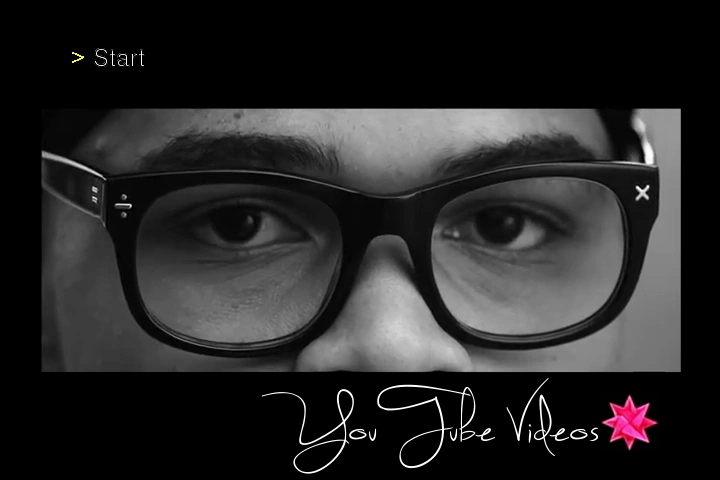
Convert your PNG image to a tiny four second MPG video for your DVD main menu.
Example:
tovid menu -ntsc -background dvd_mainmenu.png "Start" -out dvd_mainmenu
The output file will be dvd_mainmenu.mpg
Here is the final result: (notice the "Start" button in top left)
There are an incredible number of options to create a DVD main menu. To me, the simpler the better. There are other pages on this Wiki to explain how to create more complicated menus.
Make the DVD XML File
Use a text editor to create this command. When ready, paste it into a shell prompt and run it. Alternatively, you can create a tiny shell script.
Add as many MPG files as necessary. Of course, you probably have a limit of about 4.5GB on your final disc.
The order of files is important here. Unless you want to do a lot of editing in the output XML file, better to order them correctly.
Example:
tovid xml -overwrite -dvd \
  -menu dvd_mainmenu.mpg \
  'mpg/my fav youtube video1.mpg' \
  'mpg/my fav youtube video2.mpg' \
  'mpg/my fav youtube video3.mpg' \
  -out final_dvd
This command will create a file: final_dvd.xml
Let's edit this file to make some small changes. Below is a sample XML file:
<dvdauthor dest="final_dvd">
<vmgm>
</vmgm>
<titleset>
  <menus>
    <video  format="ntsc"/>
    <pgc entry="root">
      <vob file="dvd_mainmenu.mpg" />
        <button>jump title 1;</button>
        <button>jump title 2;</button>
        <button>jump title 3;</button>
    </pgc>
  </menus>
  <titles>
    <video  format="ntsc" />
    <pgc>
      <vob file="mpg/my fav youtube video1.mpg" chapters="00:00:00" />
      <post>call menu;</post>
    </pgc>
    <pgc>
      <vob file="mpg/my fav youtube video2.mpg" chapters="00:00:00" />
      <post>call menu;</post>
    </pgc>
    <pgc>
      <vob file="mpg/my fav youtube video3.mpg" chapters="00:00:00" />
      <post>call menu;</post>
    </pgc>
  </titles>
</titleset>
</dvdauthor>
If you look closely, you will notice two things: 1) Each chapter has a separate button in the main menu. 2) After each chapter, we return to the main menu.
Let's remove all buttons but one, and have the chapters chained (play the next, etc.).
First, let's comment out all buttons except the first.
        <button>jump title 1;</button>
        <button>jump title 2;</button>
        <button>jump title 3;</button>
Becomes...
        <button>jump title 1;</button>
<!--
        <button>jump title 2;</button>
        <button>jump title 3;</button>
-->
Second, modify each chapter except the last.
    <pgc>
      <vob file="mpg/my fav youtube video1.mpg" chapters="00:00:00" />
      <post>call menu;</post>
    </pgc>
    <pgc>
      <vob file="mpg/my fav youtube video2.mpg" chapters="00:00:00" />
      <post>call menu;</post>
    </pgc>
    <pgc>
      <vob file="mpg/my fav youtube video3.mpg" chapters="00:00:00" />
      <post>call menu;</post>
    </pgc>
Becomes...
    <pgc>
      <vob file="mpg/my fav youtube video1.mpg" chapters="00:00:00" />
      <post>jump title 2;</post>
    </pgc>
    <pgc>
      <vob file="mpg/my fav youtube video2.mpg" chapters="00:00:00" />
      <post>jump title 3;</post>
    </pgc>
    <pgc>
      <vob file="mpg/my fav youtube video3.mpg" chapters="00:00:00" />
      <post>call menu;</post>
    </pgc>
Warning: Be very, very careful about modifying this XML file. If you have a large number of chapters, it is easy to make a typo and skip a chapter. Edit carefully!
Finally, cleanup the chapter start times a little. It seems ToVid, by default, adds a chapter every five minutes. Since we are using music videos, there is no need to split. Most music videos are 3-5 minutes long. If they run a little longer than 5 minutes, I am OK to use a single DVD chapter.
chapters="00:00:00,00:05:00"
Becomes...
chapters="00:00:00"
Make the DVD VOB Files
Run this command:
tovid dvd final_dvd.xml
This one of the longest steps. Be patient as your MPG files are combined to created a few DVD VOB files.
The DVD VOB files will appear in a new directory: "final_dvd"
Burn the DVD
My PC has trouble writing DVDs, so this next step is overly cautious.
I launch the Linux DVD burning software: K3b
Create a new data project and drag the AUDIO_TS and VIDEO_TS folders to the root.
I create an ISO first, then I write the DVD. Finally, I verify the data. (There is an option to verify after write is complete.)
If your PC is more powerful, you may be able to create the DVD more quickly with this command:
tovid dvd -burn final_dvd